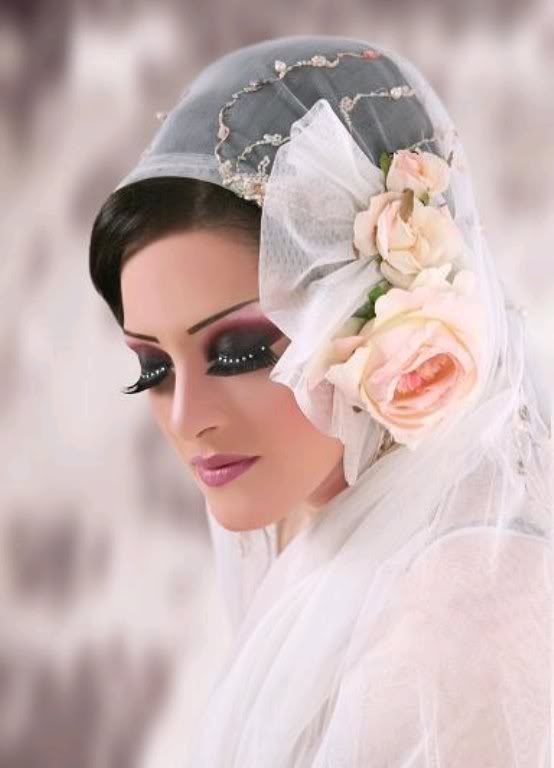
Getting a smokey eye make up tip that doesn't make you look like a raccoon can be difficult. There are many factors you have to consider. And you will have to practice a lot to get just the right smokey eyes.
You will have to experiment with holding your brush at just the right angle for the application you like best, which amount of pressure to use when applying the colors, what colors you prefer and make your eyes stand out, and how to blend the lighter colors into the darker.
Practice, practice, practice.
Basic Equipment
I'll give you the basic smokey eye make up tip equipment and color choices, and you can experiment and pick and choose what you like and what works for you.
Eyeshadow Colors: Using a black or gray eyeshadow without proper application and blending can cause you to look a little "goth", besides, it's out this season. If you don't think you want to look this way, I recommend using less intense colors.
Try violet, chocolate, coffee, dark pink, copper, dark green or purple, etc.
Eyeliner Colors: A dark grey, charcoal or black.
Basic Technique
Here is the basic smokey eye make up tip technique. Like mentioned above, practice and play around until you get the feel and the look you like.
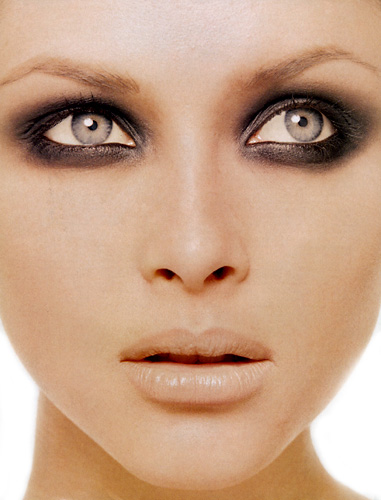
Step 1: Apply a crystalline or other highlighter shade just on your browbone. Applying it to the whole lid can cause your darker colors to look muddy when applied over it. Apply a little under your eye and right at the tear duct to keep eyes looking wide and "open".
Step 2: Using a taupe, nude or sand color, apply just to your eyelid.
Step 3: Use a flat edge brush for this part. Rub the side of the bristles in your darker color. Then hold the brush almost vertically, with the flat edge touching your eyelashes. Sweep the color straight up to just above the crease. It's all about technique here. You need to be able to see this color a little above your crease when your eyes are open.
Step 4: Finally, use your darkest color for this step. It can be a dark brown, metallic colors, darker purples and greens, whatever. Use the same technique and sweep the color from your eyelashes up to just below the crease. Too high and you'll look like a raccoon.
Step 5: Using a soft pencil eyeliner in black or charcoal, line all the way around your top and bottom lids. Using your finger or a sponge tip, smudge the eyeliner, so it doesn't have a distinct line. If you prefer, you might want to apply your mascara first, so you can blend any mistakes into the eyeliner. You can also use eyeshadow and an eyeshadow brush to line your eyes.
Step 6: Now use a very dark eyeshadow (black, dark grey, very dark purples or maroons, etc.) and smudge it into the pencil line and out and around your whole eye. (Don't smudge over your tearduct!)
Step 7: Now apply (a lot of) mascara and curl your lashes. This will finish your smokey eyes look.
Using this smokey eye make up tip and a little practice, you'll have gorgeous eyes in no time.
Showing posts with label Airbrush Wedding Makeup. Show all posts
Sunday, June 17, 2012
Smokey Eye Make Up and Eye Make Up Ideas
Are you longing to have a fabulous fun date wearing a glamorous exciting eye shadow make up and sitting over an elegant dinner at a very sassy restaurant?
The answer is yeeessssss!!!
Make the concealer your under eye shadow make up base by starting at the inner part down to the outer edge of the eyes. When applying eye make up, please do not rub the make up, just pat until the discoloration evens out or disappears.
The secret to keeping your eye make up from fading within minutes from application is to apply a make up base first without properly priming your eyelid so it will not form a greasy line and crease.
Start your make up color works using a three-toned eye shadow. Apply with your brush or applicator from your lids to brow and create a smokey eye make up effect. Blend the colors like a rainbow. You will look gorgeous with this color set blending technique. Begin by selecting a light color that matches the color of your lid and then spread it across up to your brow's bone when applying eye make up. Follow your eye shadow make up with a medium tone across your lid and then put a darker attractive color in your crease part. Brush to blend the colors well.
Eyeliners can do wonders enhancing the shape of your eyes especially for a smokey eye makeup. You may use your best eyeliner pencil or dark eye shadows for greater smoother blend.
How to apply eyeliner: Choose a slanted brush, wet the tip, and then dip in the dark eye shadow. You create a line as close to your upper lashes as possible starting from the inner to the outer core. Put on best eyeliner at the bottom of your eyes. Make sure it is only the line from the middle part of your eyes to outer part. Smudge the bottom line with your little finger so it will not look prominent.
Create a smokey eye make up effect by patting the dark eye shadow with the brush along your upper lid as well as below your lid. Smudge to blend. Use a highlighter to brighten your eyes. Gold or pink highlighter blends well with any eye shadow color. This is great for the inside part of the eye application only. Here's one of the best make up tips I found in the internet. Draw a V-shape line following top to bottom inner core of your eyes to make your eyes pop. Blend with your fingers.
Highlight your eyebrow using the same eye shadow make up highlighter color and dab it from your mid brow to your outward brow bone. Blend again using your finger. Curl your eyelashes and put on mascara. Now you are ready for a fun date. Enjoy!
The answer is yeeessssss!!!
Make the concealer your under eye shadow make up base by starting at the inner part down to the outer edge of the eyes. When applying eye make up, please do not rub the make up, just pat until the discoloration evens out or disappears.
The secret to keeping your eye make up from fading within minutes from application is to apply a make up base first without properly priming your eyelid so it will not form a greasy line and crease.
Start your make up color works using a three-toned eye shadow. Apply with your brush or applicator from your lids to brow and create a smokey eye make up effect. Blend the colors like a rainbow. You will look gorgeous with this color set blending technique. Begin by selecting a light color that matches the color of your lid and then spread it across up to your brow's bone when applying eye make up. Follow your eye shadow make up with a medium tone across your lid and then put a darker attractive color in your crease part. Brush to blend the colors well.
Eyeliners can do wonders enhancing the shape of your eyes especially for a smokey eye makeup. You may use your best eyeliner pencil or dark eye shadows for greater smoother blend.
How to apply eyeliner: Choose a slanted brush, wet the tip, and then dip in the dark eye shadow. You create a line as close to your upper lashes as possible starting from the inner to the outer core. Put on best eyeliner at the bottom of your eyes. Make sure it is only the line from the middle part of your eyes to outer part. Smudge the bottom line with your little finger so it will not look prominent.
Create a smokey eye make up effect by patting the dark eye shadow with the brush along your upper lid as well as below your lid. Smudge to blend. Use a highlighter to brighten your eyes. Gold or pink highlighter blends well with any eye shadow color. This is great for the inside part of the eye application only. Here's one of the best make up tips I found in the internet. Draw a V-shape line following top to bottom inner core of your eyes to make your eyes pop. Blend with your fingers.
Highlight your eyebrow using the same eye shadow make up highlighter color and dab it from your mid brow to your outward brow bone. Blend again using your finger. Curl your eyelashes and put on mascara. Now you are ready for a fun date. Enjoy!
Bridal Wedding Makeup
Bridal wedding makeup can be the difference between a disaster bridal look and the perfect blushing bride.
The key to any bridal makeup is starting with a good base. Wedding makeup needs to breathe, to last, and to look flawless. One of the best ways of achieving this for bridal foundation is by using an airbrush-while it may seem like a new 'fandangle' technology, airbrushing has been used for years in the film and television industry to make celebrities and personalities look great-so why not you on your wedding day?
Bridal foundation is a little different that normal foundation in that it needs a few extra contour lines done to make sure the bride's face is not dimensionless in the photographs-this contouring is also best done with an airbrush, as it gives the most naturally looking contour lines, much more blended and seamless than manually applying contouring.
Bridal Wedding makeup also needs to draw attention equally on the face-this means a balance between eyes, lips and brows. This does not mean that if you want heavy eye makeup you also have to have fire engine red lips-but it means that a lip color should be chosen that has some relationship to the eye colors, and will not be subsumed by the intensity.
Highlighting is another key for bridal wedding makeup. There are six parts of the face that need highlighting. Cheek bones are the obvious ones, but the center of the nose is another - although a pearly or reflective highlight should be avoided for the nose. One the eyes, the arch of the brow bone, the center of the lid and the inner corner of the eye should all have the same highlight color (usually a pearl) applied - this not only brightens the eye, but give dimension in photographs. Lastly is the lips. The same highlight used on the eyes can be taken on a finger and pressed onto the center of the lips-this will not be visible to the eye, but it will attract light, and make the lips appear fuller.
Bridal wedding makeup really wouldn't be complete without some false lashes - some women are turned off by the thought of a full set because they think it looks too overdone, but a couple of well-placed single lashes along the outer corner of the upper lid do wonders for opening up the eye and really giving eyes and added oomph.
The most important thing to remember is to enhance the brides natural features - Bridal wedding makeup shouldn't make the bride unrecognizable, after all, her husband to be wants to be able to recognize her at the altar!
Check out additional tips and tricks by going to one of my favorite sites Bride Makeup. You can also find out why Airbrush Wedding Makeup is quickly becoming the number one choice of wedding makeup artist experts.
The key to any bridal makeup is starting with a good base. Wedding makeup needs to breathe, to last, and to look flawless. One of the best ways of achieving this for bridal foundation is by using an airbrush-while it may seem like a new 'fandangle' technology, airbrushing has been used for years in the film and television industry to make celebrities and personalities look great-so why not you on your wedding day?
Bridal foundation is a little different that normal foundation in that it needs a few extra contour lines done to make sure the bride's face is not dimensionless in the photographs-this contouring is also best done with an airbrush, as it gives the most naturally looking contour lines, much more blended and seamless than manually applying contouring.
Bridal Wedding makeup also needs to draw attention equally on the face-this means a balance between eyes, lips and brows. This does not mean that if you want heavy eye makeup you also have to have fire engine red lips-but it means that a lip color should be chosen that has some relationship to the eye colors, and will not be subsumed by the intensity.
Highlighting is another key for bridal wedding makeup. There are six parts of the face that need highlighting. Cheek bones are the obvious ones, but the center of the nose is another - although a pearly or reflective highlight should be avoided for the nose. One the eyes, the arch of the brow bone, the center of the lid and the inner corner of the eye should all have the same highlight color (usually a pearl) applied - this not only brightens the eye, but give dimension in photographs. Lastly is the lips. The same highlight used on the eyes can be taken on a finger and pressed onto the center of the lips-this will not be visible to the eye, but it will attract light, and make the lips appear fuller.
Bridal wedding makeup really wouldn't be complete without some false lashes - some women are turned off by the thought of a full set because they think it looks too overdone, but a couple of well-placed single lashes along the outer corner of the upper lid do wonders for opening up the eye and really giving eyes and added oomph.
The most important thing to remember is to enhance the brides natural features - Bridal wedding makeup shouldn't make the bride unrecognizable, after all, her husband to be wants to be able to recognize her at the altar!
Check out additional tips and tricks by going to one of my favorite sites Bride Makeup. You can also find out why Airbrush Wedding Makeup is quickly becoming the number one choice of wedding makeup artist experts.
Is Airbrush Wedding Makeup Really Your Best Choice?
The secret is out regarding celebrity's flawless red carpet Makeovers - airbrushing has hit the mainstream and the fantastic benefits of airbrush technology are now available to everyone.
One of the strongest areas of demand for the technology is in airbrush wedding makeup, because it is the day where every woman wants to look her absolute best. Airbrush wedding makeup can certainly provide the same flawless look that celebrities have at gala events but the benefits go far beyond just looking great.
Long Lasting
Airbrush makeup is extremely long-lasting. This is because the foundation is formulated with micro-pigments which adhere to the skin without clogging pores or even looking like makeup, but which really provide longer lasting coverage that won't budge, slide or need touch-ups during the event.
Natural Look and Feel
Any wedding makeup needs to take into consideration the wedding night, and no bride wants their new husband to get up close and be able to see an inch-thick layer of foundation. Airbrush foundations go on the skin in a super fine mist, so in most cases it will hardly look like makeup at all, and it is also totally touchable so your hubby will just think his new bride has flawless skin!
Easy to Take Off
Because there is only a thin (but powerful) layer of makeup on the skin, it is far easier to remove than thick foundation, and that means you won't look all red and blotchy from rubbing off makeup on the wedding night. Airbrush wedding makeup is so light and breathable that many brides just decide to keep the foundation on throughout the night.
Easy on, Easy off Eyes
Airbrush wedding makeup is not limited to foundation, but can also be used for the eyes, cheeks, contouring and décolletage as well. Eye-shades are pretty extensive with most brands, and custom shades can easily be mixed. Airbrush eye-shadow provides the same long-lasting benefits of the foundation and can be blended perfectly. Contrary to what many may think, airbrushing is actually very precise, so getting perfect smoky eyes is no hassle at all with an airbrush stylus.
Getting your wedding makeup right is one of the most important aspects of your wedding day, so thinking ahead is essential. A good idea is to find a local salon or makeup artist that offers airbrushing and book a trial - this way you get to test your "wedding look" as well as see the benefits of airbrush wedding makeup for yourself. If you want to do your own makeup, then practice is really important, especially if you don't already know how to use an airbrush - it's not hard at all to master, but its best if you feel really confident for the big day.
One of the strongest areas of demand for the technology is in airbrush wedding makeup, because it is the day where every woman wants to look her absolute best. Airbrush wedding makeup can certainly provide the same flawless look that celebrities have at gala events but the benefits go far beyond just looking great.
Long Lasting
Airbrush makeup is extremely long-lasting. This is because the foundation is formulated with micro-pigments which adhere to the skin without clogging pores or even looking like makeup, but which really provide longer lasting coverage that won't budge, slide or need touch-ups during the event.
Natural Look and Feel
Any wedding makeup needs to take into consideration the wedding night, and no bride wants their new husband to get up close and be able to see an inch-thick layer of foundation. Airbrush foundations go on the skin in a super fine mist, so in most cases it will hardly look like makeup at all, and it is also totally touchable so your hubby will just think his new bride has flawless skin!
Easy to Take Off
Because there is only a thin (but powerful) layer of makeup on the skin, it is far easier to remove than thick foundation, and that means you won't look all red and blotchy from rubbing off makeup on the wedding night. Airbrush wedding makeup is so light and breathable that many brides just decide to keep the foundation on throughout the night.
Easy on, Easy off Eyes
Airbrush wedding makeup is not limited to foundation, but can also be used for the eyes, cheeks, contouring and décolletage as well. Eye-shades are pretty extensive with most brands, and custom shades can easily be mixed. Airbrush eye-shadow provides the same long-lasting benefits of the foundation and can be blended perfectly. Contrary to what many may think, airbrushing is actually very precise, so getting perfect smoky eyes is no hassle at all with an airbrush stylus.
Getting your wedding makeup right is one of the most important aspects of your wedding day, so thinking ahead is essential. A good idea is to find a local salon or makeup artist that offers airbrushing and book a trial - this way you get to test your "wedding look" as well as see the benefits of airbrush wedding makeup for yourself. If you want to do your own makeup, then practice is really important, especially if you don't already know how to use an airbrush - it's not hard at all to master, but its best if you feel really confident for the big day.
Subscribe to:
Posts (Atom)